Angular 2 Quick Start with TypeScript and ASP.NET Core in Visual Studio 2015
In this tutorial-like write-up, I hope to get people started quickly with an Angular 2 app with TypeScript and ASP.NET Core RC2 in Visual…
In this tutorial-like write-up, I hope to get people started quickly with an Angular 2 app with TypeScript and ASP.NET Core RC2 in Visual Studio 2015.
From the title I assume only people with Visual Studio 2015 will get here. In addition, we’re gonna need a few things to get going. We will list them and instructions to install them, so if you have a prerequisite already installed, skip the respective portions.
We will try to follow the Angular 2 with TypeScript 5 Minute Quickstart as closely as possible, so that the original page may serve as a reference. However, we will take some deviations, in order to work with Visual Studio 2015 and ASP.NET Core. These are easily identified.
I do not wish to copy-paste their explanations, so if you wish to have more explanations on what is what and why things are the way they are, I would advise you to read the explanations in the above-mentioned link. It is well-written. This guide is just about setting up an Angular 2 with TypeScript and ASP.NET Core in Visual Studio 2015.
Prerequisite: ASP.NET Core SDK
The SDK and the tools to develop ASP.NET Core applications
Head to Microsoft’s Core Downloads Page and follow the simple instructions there to make sure that your RC2 and tools are setup properly. The Visual Studio Installer is the option we’re looking for, and once it’s done, we can move on to the next step.
Prerequisite: Node.js and Node Package Manager (NPM)
The javascript runtime and the package manager used by Angular 2
If you don’t have node.js installed, head to the Node.js Downloads page and download and run the Windows installer.
If you already have node.js installed, you likely have the npm installed too. Let’s just make sure the versions are up to date. Open your command prompt, and type node -v and press Enter. This gets you the node version. Type npm -version to get the version of the npm installed. I recommend getting the highest versions (node.js v6.2.1 and npm v3.9.3 as of writing).
Prerequisite: Gulp.js
The build system that we need to get our current setup started
We are going to have to go through a few hoops with Visual Studio 2015 projects working a bit differently than how IDEs like Sublime Text or Visual Studio Code work, so we need Gulp.js. Gulp.js is a streaming build system. Now that we have npm installed, we can install gulp via npm as a global module. Open up command prompt and type npm install gulp -g and this should install gulp.
Creating an ASP.NET Core Web Application
The barebones scaffold project that will give us a kick-start
Let’s start by creating a new ASP.NET Core web application. If you have the SDK and the tools installed, when you select File -> New -> Project in Visual Studio 2015, you should see the following options in the Web section of the Installed Templates:
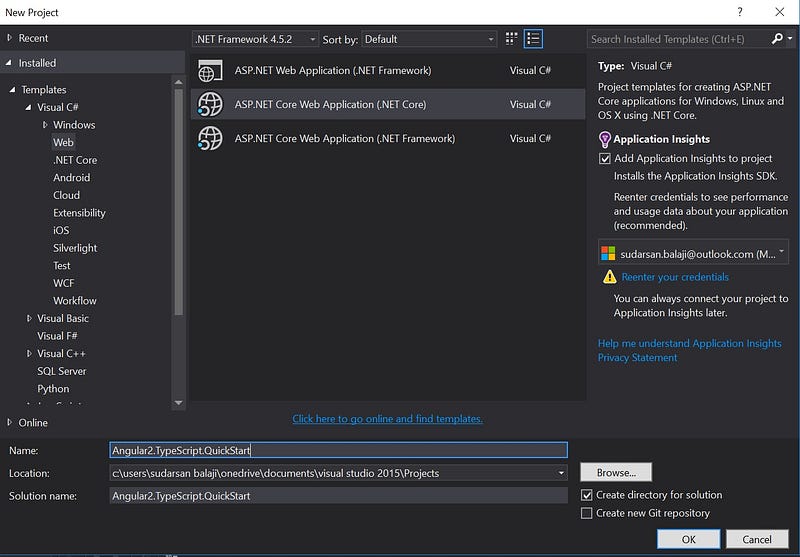
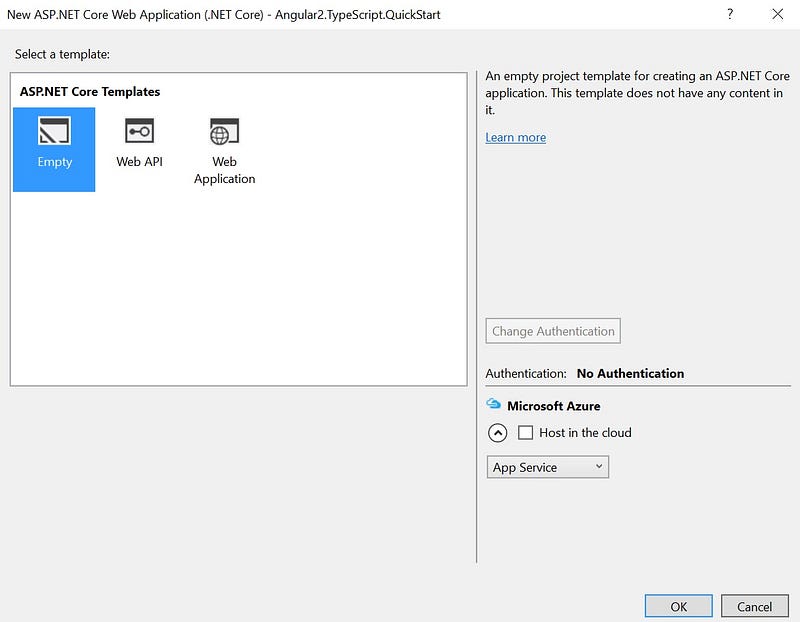
Select the ASP.NET Core Web Application (.NET Core) template, and give a suitable name for the project. You can see that I’ve chosen Angular2.TypeScript.QuickStart as the project and solution name. Once we click OK, we are taken to another screen where we can choose the templates. Let’s start with an Empty template that will create a barebones application scaffold for us to start with. Make sure the Authentication is set to “No Authentication” and the Microsoft Azure “Host in the cloud” checkbox is unchecked. Click OK to have the project created for us.
Serving static files in ASP.NET Core RC2
A Single Page Application (SPA) in Angular 2 on ASP.NET Core
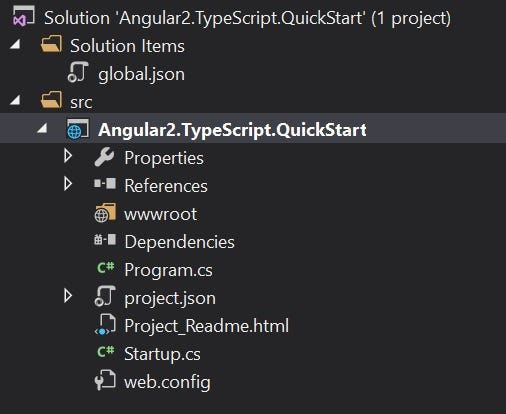
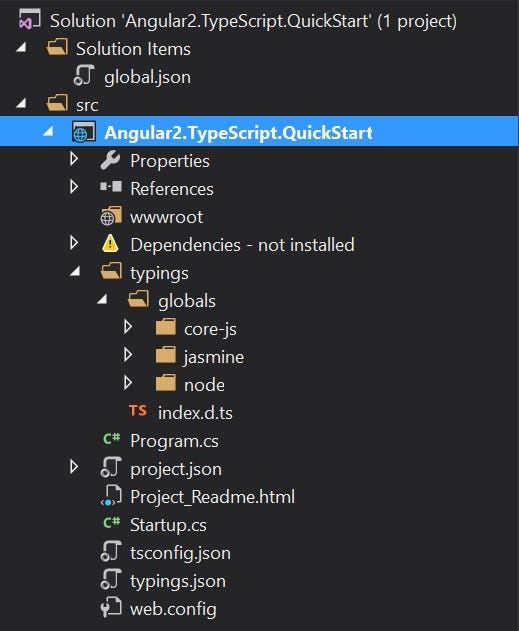
Now that we have the project setup, we should have a project structure as shown here:
We need to add some basic configuration to make sure our setup works, and our angular project can pull its dependencies properly. ASP.NET Core projects are geared towards server-side MVC. But we are about to do a Single Page Application (SPA) with Angular 2 and TypeScript. So first we need to make the app use static files.
Head to Startup.cs in our project, and find the Configure method:
We need to configure the app to use static files. Change the Configure method as:
The methods cannot be found and Visual Studio will start showing errors. ASP.NET Core RC2 is highly modularized and this is a good thing. We can pick and choose the parts of functionality that we want in our applications that run on ASP.NET Core RC2. The functionality we are looking for is nestled away in the nuget package Microsoft.AspNetCore.StaticFiles v1.0.0-rc2-final.
Let’s add the nuget package as a dependency to our ASP.NET Core web application. Head to project.json and see the dependencies portion, and add the following line:
As soon as you add the line and save the file, the package will be downloaded and you will have no errors. Now that we have setup the project for .NET Core, we have to setup the project for Angular 2 and Typescript.
Setting up node package dependencies
Adding the npm configuration and pulling packages
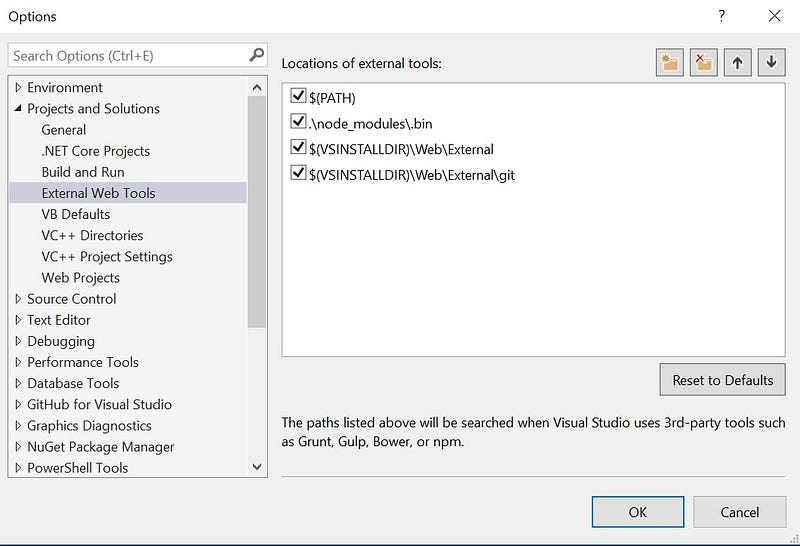
Visual Studio 2015 installs a version of node.js and npm upon installation, and will attempt using the same versions, even if you have installed a more recent version. We have to fix this first. Head to Tools -> Options and in the dialog box that opens, select Projects and Solutions -> External Web Tools. On the right pane, make sure that the $(PATH) option is at the top. You might have to move it to the top if it is not already there.
We need to specify the node packages that our quickstart app depends upon, and package.json is the place to the do it. We need to add it to our project. Right-click our project, and in the context menu, select Add -> New Item… to have multiple options appear. Our aim is to select the npm Configuration File option in the .NET Core -> Client-Side section.
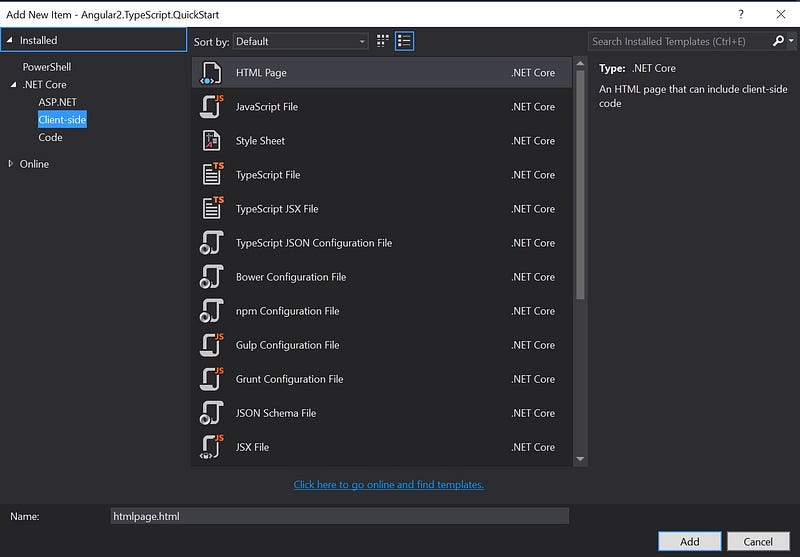
Selecting that option will add a package.json file for us to edit. Replace the contents of the file with the following:
The gulp 3.9.1 dependency is something that we added to enable us to jump through the hoops that I’ve been talking about. We’ll get to it soon enough. I just wanted to note here that it is a deviation from the tutorial mentioned above.
As soon as you hit Save, the npm dependencies will be installed by Visual Studio and we will have completed this step. The packages are actually installed in a folder named node_modules located in the project root.
NOTE: Visual Studio may show that the dependencies are not installed at this stage, we can safely ignore it for now.
Configuring TypeScript
Adding TypeScript Configuration and Definitions
Now that we have defined our npm dependencies, we need to configure TypeScript for our project. TypeScript is a language that compiles into JavaScript and we basically have to tell our TypeScript compiler how and what to convert to JavaScript. We have two files, tsconfig.json and typings.json for this purpose.
Remember the Add -> New Item… dialog? We need to use it now, to add a TypeScript JSON Configuration File. It will add a tsconfig.json file for us to edit. Replace its contents with the following:
In addition to configuring the compiler to use commonjs module and produce ES5 output, we have excluded the node_modules and wwwroot paths from being picked up for compilation, because we do not want the .ts files in those folders to be compiled into javascript. We already know that the node_modules folder is where the npm packages are pulled into. The wwwroot is the folder where static files are served from in an ASP.NET Core web application.
For TypeScript definitions, we need to add a JSON file to the project root, named typings.json with the following contents:
Now that we have added typescript configuration, we need to install the definitions mentioned in our typings.json. This is easily done by restoring npm packages again. Expand the Dependencies section in the project. Right-click the npm folder and select Restore Packages. The definitions should be restored, and now the folder structure should look like this:
Configuring dynamic module loading
Using SystemJS as a universal dynamic module loader
We use SystemJS as a universal dynamic module loader, and configure it here. We write modular code, compiling TypeScript into JavaScript, and then load the modules dynamically at run time when required. SystemJs is one such dynamic module loader. There are others which do the same thing, but we use this specific loader because of its use by the tutorial mentioned above. For more information on why it was selected, I would prefer that you read this from the team that made the 5 minute quickstart.
Right-click the wwwroot folder of the project and select Add -> New Item… and add a JavaScript File named systemjs.config.js with the following contents:
Creating the AppComponent
Angular 2 apps are made up of reusable components
Angular 2 apps are made up of components which are reusable, and we need a root component for an app. So let’s write a super simple Angular component.
Right-click the project, select Add -> New Folder and name the folder as app. Now right-click the newly created app folder, and add a new TypeScript File as before, named app.component.ts with the following contents:
Every Angular app has at least one root component, conventionally named AppComponent, that hosts the client user experience. Components are the basic building blocks of Angular applications. A component is like a widget, it controls a portion of the view through its template, which can be simple, or can include other components. For any more explanation, head to the wonderfully written 5 minute quickstart tutorial mentioned above.
Hooking up AppComponent to the application
Bootsrapping based on browsers and whatnot
Now that we have the root component named AppComponent, we need to tell Angular to load the AppComponent first. To do this, we use a main.ts file. Since we’ve already covered adding files to a particular folder, add a main.ts file to the app folder, and fill it up with the following contents:
Creating the Single Page Application (SPA)
The first page of the application is also the only page
Now that we have our dependencies downloaded, TypeScript configured, dynamic module loading configured, and our components ready and bootstrapped, it is time to create the first and only page of our Angular 2 SPA. Let’s create an index.html in wwwroot with the following contents:
NOTE: The styles are actually found at Angular’s GitHub Repo
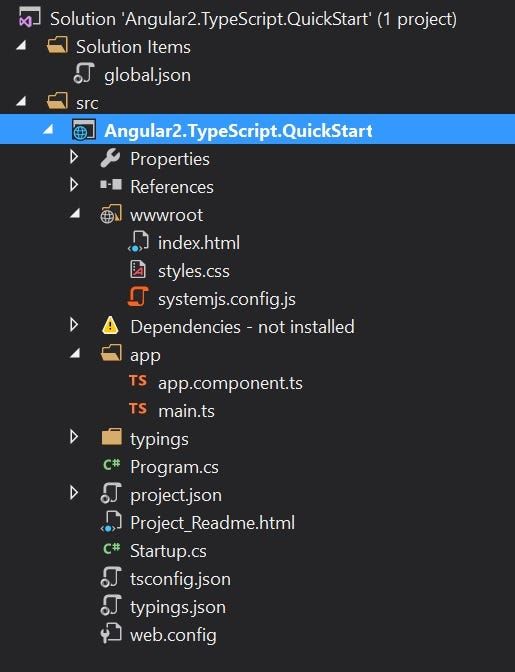
The project structure should now look like this:
Jumping through the hoops to get things going
The hoops that I’ve been talking about for so long
This is actually where the excellent 5-minute quickstart I mentioned above ends. Ideally, everything should work. But remember the hoops that I mentioned before, many, many times? The reason we needed gulp.js, a dependency not specified in that tutorial?
What really happens is, Visual Studio 2015 restores the npm dependencies into a folder named node_modules that is actually outside wwwroot so we cannot serve the files there statically. We cannot also copy all the files in the node_modules folder into wwwroot. It would take a lot of time, and would have to copy a lot of unnecessary files. Also, our app.component.ts and main.ts are not compiled into JavaScript, and don’t rest inside wwwroot so they can’t be served statically either.
See those big hoops now? Time to jump through them. We are going to compile into JavaScript, and then use gulp.js to copy the required node_modules and the required app files into the wwwroot folder just before build, to make sure that they are available at run time.
Remember the Add -> New Item… dialog? It’s time to bring it up again for our project. This time, select Gulp Configuration File, and replace its contents with the following:
We are basically finding all JavaScript(.js) and Source Map (.map) files from the two folders node_modules and app, and moving them into wwwroot. The bindings mentioned above the file will bind them to Visual Studio 2015 build operations.
It’s time to build the project. When we build, the TypeScript is compiled, the gulp tasks are run, and the files are in their place. Run the project to see the output:

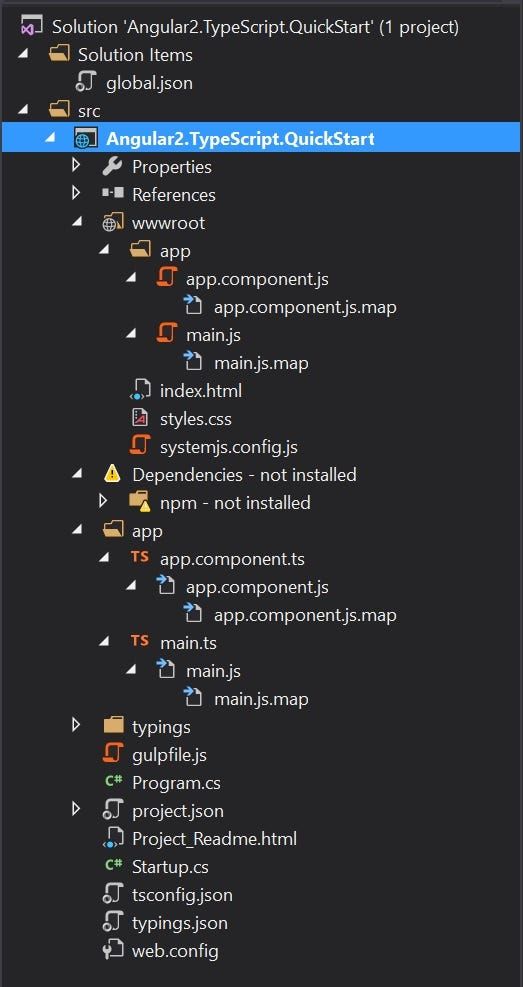
For your reference, this is how the project structure should look now:
Did this work for you? Could I have done something better? Have I missed something? Would you like more explanations of why stuff is done, instead of just pointers as to what is to be done? Anything else that you want to say? Please use comments to place your feedback, suggestions, whatever you feel like sharing.
Cheers!